Scan File Data Extractor
Verification results in a spreadsheet
The Scan File Data Extractor enables you to summarise and record all the verifications made by recording them in a standalone database. It uses the data from the Axicon scan files (those with a .scn extension) to create a complete record of all the files that have been saved, either automatically or manually.
It is therefore possible for a quality manager, for instance, to inspect verifications made by a member of staff from a particular shift, or even from a remote site over any period (say, a week or a month) in order to monitor print press performance and barcode quality.
Scan files can also be imported into the database manually by selecting the import function from the file menu. It is possible to import a whole folder of scan files, or just a selection, in one import process, simply by selecting all of the files that are required.
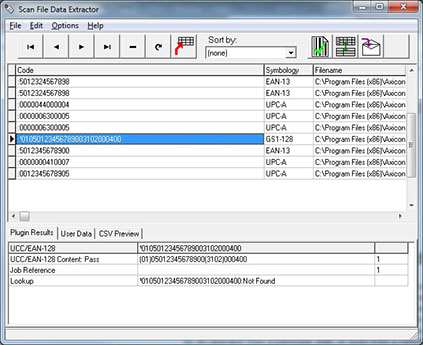
Imported verification results are displayed in the table of records. Each row contains data from one scan file, and each column contains a single item of data from the scan file. If verifications have been saved with additional plugin data, this information is displayed in its own panel below the main table. The table can be sorted on certain fields to make locating a particular verification record easier when the table contains many results, and it is also possible to see more detail about an individual record by selecting Display Scan from the file menu, or clicking on the Axicon Linear Verifier icon . This will launch the Axicon Linear Verifier software (if it is not already running), and will open the scan file for viewing in that application.
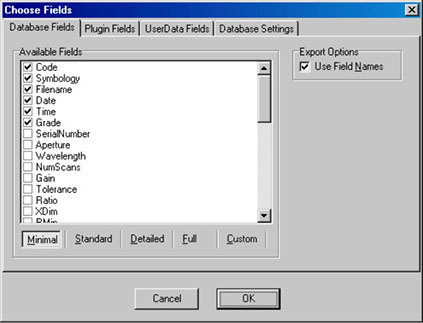
The table itself can be extremely useful for viewing the complete data about all of the verifications that have been imported, but when generating a report from this data it is likely that only some of the data will be required. It is possible to export chosen fields of data from the table to a CSV (comma separated values) file, for use in an application such as Microsoft Excel.
This is done by selecting Choose CSV fields from the options menu. It is possible to select whichever data fields may be required and to choose whether or not plugin results are also output to the CSV file by selecting the plugin fields tab and ticking the appropriate plugin. This data can then be stored in a CSV file format by selecting Save CSV from the file menu and it is possible to see the output format for this file in the panel beneath the table if the CSV preview tab is selected.
Data can always be added to the table by importing more scan files. It is possible to clear the database completely by selecting the appropriate option from the options menu if a fresh start is required. Individual records can also be deleted from the database by selecting the record so that it is highlighted and then clicking the - button.
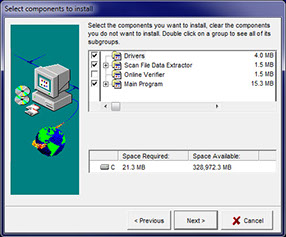
To install the scan file data extractor you will need to tick the component box on installation of the linear software. If you have already installed the linear software then just simply reinstall, don’t worry all of your settings will be automatically saved.
